My lovely coworker found this amazing app for annotating, and I have to share!
Tiny pdf is a FREE app that allows students to annotate pdfs.
My
students are all logged into one Dropbox account at the same time on their Ipads.
This way, they can all see what I share with them, such as a pdf! Tiny
pdf allows you to connect a Dropbox so that any pdf in a Dropbox folder
will appear in the app.
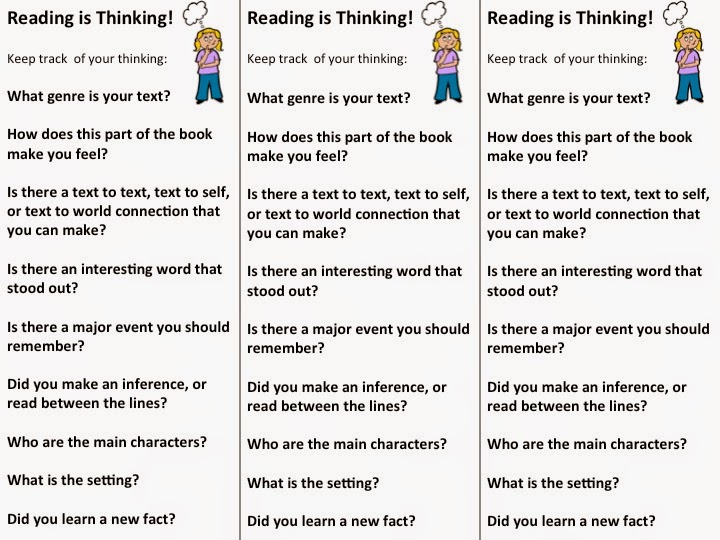
This week, we started reading a
Science A-Z book in tiny pdf so that we could use our think marks to
annotate. First, we opened tiny pdf. Then we connected our Dropbox account by following the prompts and logging in using our classroom email and password. Each student had to type in the email and password, but it did not take too long! Once students are logged in, just like in Dropbox, they stay logged in. No need to ever log in again! As you can see, it is also possible to upload a Google Drive account as well.
After our folders appeared, we opened the Science A-Z book in the app and wrote on it! The app saves documents that are being annotated, so my students can go back and add more notes and think marks while they read. They absolutely LOVED it, and their comprehension sky-rocketed after reading just one section. We had a great discussion, and they cannot wait to keep reading and annotating more in all subjects!
Showing posts with label iPads. Show all posts
TodaysMeet
Sunday, February 15, 2015
This week my third graders have improved their comprehension during read aloud and reading mini lessons by using TodaysMeet!
This website has many uses, but I have been using it for a backchannel while reading aloud. The backchannel is the conversation that goes on alongside the primary activity, presentation, or discussion. This allows for students to show their thinking while I am reading, and it does not interrupt the flow of the reading or the lesson!
This is a snapshot of one of our conversations this week while reading "The Lion, The Witch, and the Wardrobe."
We were practicing using "Think Marks" to enhance our reading comprehension. For example, the question mark means that student is confused. A star means that student thinks that part is important. The conversation that arose online while I was reading was amazing! They really had to listen and comprehend in order to respond online.
To set up a room, go to www.todaysmeet.com.
Pick a name for your room, and decide how long you want to keep the room open. I choose one month for my reading room. Then Open your room!
Once your room is Open, if you look at the website, your room has a unique website so that you and your students can access the room. I created a room named Blog, and this is the website for that room. I add the websites for my rooms on our www.tizmos.com classroom page! This way the students can get to the room quickly.
Finally, each student goes to the website on their Ipad and types in a name to join! I have my students use their first names only.
I am planning on using TodaysMeet for other lessons, but for the past month it has been an amazing tool to increase reading comprehension.
Annotating in Skitch
Thursday, February 5, 2015
This week we read a fable and annotated it in one of our favorite apps, Skitch! We have been working on close reading and using think marks to annotate. This of course is possible with paper, but using Skitch has made annotating a really fun process!
In Skitch, you can write and type over pictures! It is perfect for annotating on the ipad, as well as other activities. To annotate pdf files it costs extra, but to write on a jpg or png picture file, it is free!
To do this, I first scanned the pages I wanted and downloaded them to my own ipad. Then I took a screen shot of each page. This created a picture file that I could write on in Skitch!
I downloaded these pictures to the classroom Dropbox account so that all of my students could see the pictures. Each page is separate, but since my students are working on close reading, they only really need one page at a time! To open a page in Skitch from Dropbox to annotate, click the blue box on the right at the top of the picture. Then click "Open in."
Next click on the Skitch icon for "Open in Skitch."
Then the document is open in Skitch so that your students can write on it!
The pen on the right allows students to choose whether they want to write or type. The color on the left allows students to choose color as well as thickness of line. While there is not as much room to write answers to questions, there is plenty of room for annotating!
Ipads Are Awesome, but So Are Paper Spelling Games!
Monday, February 2, 2015
Last week my students learned how to use Spelling City to practice their spelling words! To create an account it is free! I type in their spelling lists each week. I have three levels, and three lists. Then in their app they can search for my name to find their list. Once they search for my name once, it saves on their ipad, and they can play games to practice their words any time. The free app works best on the ipad since there is no flash player for the regular website.
They also love paper spelling games! Here is our spelling game for the: or, ore, our, oar, ar vowel variant pattern. Just click on the image to download for FREE!
IBooks for Read To Self
Saturday, January 31, 2015
My last post explained how I use Dropbox to share documents and books with my students. This week I took this a step further!
IBooks has some amazing features for "Read to Self" as well as for guided reading. (I use the Daily Five model for my Reader's Workshop.) After teaching my students about these features, it was impressive to see them in use!
First, we had to get our book from Dropbox into iBooks. (My last post explains how to get a book into dropbox. Our books are from Reading A to Z!) This screen shows our book in Dropbox. Click on the blue box with the arrow, click on "Open in", then "Open in ibooks."
Now this book will be saved in the ibooks library! We closed these apps, and opened the Settings.
Next we turned on "Text to Speech" in our settings. We started by clicking on "General," then "Accessibility."
Then we clicked on "Speech."
Finally, we went back to our book in ibooks, highlighted a word by pressing down on it, let go, and LISTENED to it by clicking "Speak"! This is a simple trick that can help all readers when they are struggling with a word independently.
After learning about this, my students took a reading comprehension assessment using the cause and effect strategies they had been learning about all week. They used the "speak" feature for words when necessary, and no one really abused this. It helped them with their comprehension, and they felt more confident answering the cause and effect questions. I will NOT have them use this all of the time, but it is great to have when they need it, especially for my students struggling with fluency or students with IEP's. If you only have a few ipads in your room, this could definitely help those students who need fluency help!
IBooks has some amazing features for "Read to Self" as well as for guided reading. (I use the Daily Five model for my Reader's Workshop.) After teaching my students about these features, it was impressive to see them in use!
First, we had to get our book from Dropbox into iBooks. (My last post explains how to get a book into dropbox. Our books are from Reading A to Z!) This screen shows our book in Dropbox. Click on the blue box with the arrow, click on "Open in", then "Open in ibooks."
Now this book will be saved in the ibooks library! We closed these apps, and opened the Settings.
Next we turned on "Text to Speech" in our settings. We started by clicking on "General," then "Accessibility."
Then we clicked on "Speech."
Turn on the "Speak Selection" by sliding the white circle over to make it appear green! After this is on, you can slide the white circle to change the speaking rate. We also have on "Highlight Content" so that the words read aloud are highlighted.
Finally, we went back to our book in ibooks, highlighted a word by pressing down on it, let go, and LISTENED to it by clicking "Speak"! This is a simple trick that can help all readers when they are struggling with a word independently.
After learning about this, my students took a reading comprehension assessment using the cause and effect strategies they had been learning about all week. They used the "speak" feature for words when necessary, and no one really abused this. It helped them with their comprehension, and they felt more confident answering the cause and effect questions. I will NOT have them use this all of the time, but it is great to have when they need it, especially for my students struggling with fluency or students with IEP's. If you only have a few ipads in your room, this could definitely help those students who need fluency help!
Labels:
dropbox,
ibooks,
iPads,
Reader's Workshop
Apps for the I Pad
Tuesday, January 20, 2015
With any piece of technology in the classroom, it is all about how it is used to ENHANCE and TRANSFORM learning that is already occurring. The SAMR model is a great way to push yourself when designing lessons using technology:
While using Notes on the I Pad, as I previously posted, to jot down notes while reading is just a "Substitution," there are many ways to move up levels on the SAMR model with only a few apps!
With most of these Apps listed above, "Redefinition" can occur! It is all about how you use the apps that you have. Buying endless games is not really necessary when the internet is available for games. I am sure there will be more apps that are explored as the year goes on, but this basic list is really all my students will need to enhance and transform their learning using I Pads. More to come on how this goes when we get our apps!
Notes on the I Pad
Tuesday, January 13, 2015
Although a list of apps was submitted to the Tech Department by our team, they are not on our I Pads yet. Luckily, there is much that can be done with basic apps.
Since the beginning of the year, I have been teaching my students how to track their thinking while reading. They have been using post it notes to jot down things that they are thinking about while reading.
Click the image above for free bookmarks to help track thinking!
Really any thinking and jotting down of thoughts is promoted while reading, and my students are becoming excellent at doing this during their "read to self" and "read to someone" time. The problem is this:
Post its everywhere! Some students LOVE it, and I would not change this for the world. Some though would rather write down their thoughts digitally. This is where Notes on the I Pad comes in! They can track their thinking to their hearts' content without killing so many trees. SIMPLE, but very effective, and my students love it.
At the end of Reader's Workshop time (I use the Daily Five routines), we always share post its as a class, from the morning of reading, writing, and word work. On the I Pad, they can now share their writing digitally very easily using my document camera or connecting their I Pads to the Smart Board.
Example of a student note:
Remember: Reading is Thinking!
No Apps? No Problem!
Monday, January 12, 2015
Apps are a wonderful thing, but there is SO much that can be done on
an I Pad without very many apps! Today my third graders and I added
some "shortcuts" to our home screens by using the "Add to Home Screen" feature on our I Pads!
The first website we added to our home screens was www.tizmos.com/keeverscrew. This is my personal www.tizmos.com site, and below is how we added it! This website allows you to add many links your students may want to use throughout the day all on one page for FREE. Check mine out to see what we use on our I Pads each day without apps!
First, "Air Drop" the link you want your students to add to their home screens. It is MUCH easier than having them type it in. "Air Drop" is a way to send links and items directly from one I Pad to another. As the teacher, you can send things directly to your students!
To do this, swipe up from the bottom of YOUR I Pad and turn on "AirDrop Everyone". The students all need to this exact same thing as well!
Then, go to the website you want to send to the students on your I Pad.
Click the blue square with the arrow at the top, and you should see your students' names in circles! Send them the link by tapping on each child's name, and their I Pad will go directly to this website.
When everyone has the website open on their own I Pad, have each student click on the blue square with the arrow, then click "Add to Home Screen", and then "Add" in blue.
After it is added, every time the third graders need to access this website, they can just click on the link they made on their home screens! It will appear on their home screen after clicking the final "Add" above. Check out www.tizmos.com to set up your own free page! You can check out my tizmos page to see what links I have added for my students to use throughout the day.
The first website we added to our home screens was www.tizmos.com/keeverscrew. This is my personal www.tizmos.com site, and below is how we added it! This website allows you to add many links your students may want to use throughout the day all on one page for FREE. Check mine out to see what we use on our I Pads each day without apps!
First, "Air Drop" the link you want your students to add to their home screens. It is MUCH easier than having them type it in. "Air Drop" is a way to send links and items directly from one I Pad to another. As the teacher, you can send things directly to your students!
To do this, swipe up from the bottom of YOUR I Pad and turn on "AirDrop Everyone". The students all need to this exact same thing as well!
Click the blue square with the arrow at the top, and you should see your students' names in circles! Send them the link by tapping on each child's name, and their I Pad will go directly to this website.
When everyone has the website open on their own I Pad, have each student click on the blue square with the arrow, then click "Add to Home Screen", and then "Add" in blue.
After it is added, every time the third graders need to access this website, they can just click on the link they made on their home screens! It will appear on their home screen after clicking the final "Add" above. Check out www.tizmos.com to set up your own free page! You can check out my tizmos page to see what links I have added for my students to use throughout the day.
I Pads Arrive
Thursday, January 8, 2015
Our classroom set of I Pads came on Monday! The sleek white and blue
cart full of magical I Pads arrived unexpectedly during indoor recess.
The anticipation to receive and use these I Pads had been building for
MONTHS. Of course the I Pads arrived without a lot of warning, the
first day back after winter break, in the afternoon, the day we had TWO
specials, and everyone was exhausted. Although everyone was weary but
excited, we dove right in, and I dedicated the last hour of the day to I
Pad basics.
The first day consisted of going through basic skills. Click on the picture below to download the skills, as well as an I Pad License, and I Pad Rules. I handed out a skills sheet for each eager little face to look through while I numbered the I Pads and handed them out.
As I happily handed an I Pad to each child, the students buzzed with excitement while working together to figure out how to perform each skill on their checklist. Many began checking items off right away! After each child had their I Pad, many questions about the checklist started to arise. Such as, "How do I connect to Wi-fi?", "Where is the internet?". This let me know that it was time for a whole group question and answer session. I went through all of the questions while the students responded patiently by testing out each skill. The final question was about changing their wallpaper, so of course time was dedicated to this important personalization. Then it was time for independent skills practice! Many students felt confident right away so I began testing around 6 students at a time by going through each skill on the list. By the end of the hour, everyone could perform basic I Pad functions!
This was all accomplished on Monday, so hopefully every shining face will remember when we have school again. I have SO MANY ideas floating around in my brain, and I can't wait to see what we will accomplish!
Getting Ready for iPads!
Tuesday, August 19, 2014
Well, it has been a while since my last post! I have been enjoying an extended summer due to some construction going on in our district. I have had the time to get so much done in my classroom, but I have not had much to post about! My classroom is almost ready to reveal, and I am very happy with how it looks this year.
I have been thinking about the first day of our 1:1 initiative with iPads since last year. Today I created some helpful tools for the first week to get all of my students on the same page concerning their iPads.
Mrs. Brooks from Falmouth, MA does an excellent job of summing up how she began using her iPads in the classroom, and I tweaked her posters to fit my needs. Feel free to explore her site and use her posters! Below is what I created. Just click on the pictures to download for yourself for FREE!
Our first day of school is September 2nd, so please check back during that week to see how I implement these ideas! I plan on documenting how EVERYTHING goes with our iPads on my blog, whether it is good, bad or in between.
Subscribe to:
Posts (Atom)


